



Blog: Integrating SQLAlchemy with Flask – #6 (More Posts)
In a new series of blogs related to SQLAlchemy, I’m moving away from the command line environment and moving on to exploring how Python, Flask, and SQLAlchemy can work together to make a website that uses data dynamically.
Recap
When I left it in my last blog there was an app that had a local development server with 4 interconnected routes that formed a small website. This website contained a form which when submitted, added that data to a SQLite database. I also added the ability to click through to an individual route that displays the data corresponding the primary key field using SQLAlchemy’s queries and Flasks blocks. Lastly, we were able to edit the entries for that record and delete them at the click of a button, completing the CRUD interactions typical of an application.
You can find the previous editions to this series here.
- https://blog.jonniegrieve.co.uk/blog_posts/integrating-sqlalchemy-with-flask-1/
- https://blog.jonniegrieve.co.uk/blog_posts/integrating-sqlalchemy-with-flask-2/
- https://blog.jonniegrieve.co.uk/blog_posts/integrating-sqlalchemy-with-flask-3/
- https://blog.jonniegrieve.co.uk/blog_posts/integrating-sqlalchemy-with-flask-4/
- https://blog.jonniegrieve.co.uk/blog_posts/integrating-sqlalchemy-with-flask-5/
In this last blog, we’re going to run through a couple of final points that help make a website like this a little more user-friendly.
Error 404 Routes
The first thing we’re going to do is add a 404 Route that will display automatically if we try and follow a route that no longer exists, for example, a primary key route that has since been deleted.
We’ll need a new route… a new decorator a new function and a new template.
# Error 404 Route
@app.errorhandler(404)
def not_found(error):
return render_template('404.html', msg=error), 404
Here’s how a 404 Template might look in the HTML.
{% extends "main.html" %}
    {% block title_block %} title 404 {% endblock %}

    {% block nav_block %}
        <nav>
            <ul>
                <li><a href="/" class="" >One</a></li>
                <li><a href="/two">Two</a></li>
                <li><a href="/three">Three</a></li>
            </ul>
        </nav>
    {% endblock %}
    {% block main_block %}
        <h2>404 Error</h2>
        <div class="name_data_single">

            <h3>Error 404</h3>
            <p>Please try again!  </p>

        </div>
    {% endblock %}
So now, every time an invalid route has been used, it will bring up this template rather than the default white screen, adding to the UX experience.
Flash Messages
Secondly, I wanted to add some on-screen messages around the app whenever the database operations were completed, helping the user know what has been done and whether it was successful. Flask provides a relatively simple way to do this called Flash messaging. You pass in a string to a method called flash() and display that string in various templates throughout the app.
Let’s demonstrate this in action by first importing the relevant module to the app.
from flask import (render_template, url_for, request, flash, redirect)
# Add Flash to the imports in app.py
We can now move to the main_form() method where new data is added. Now that we’ve added the module I can add the flash() method that writes the success message we want to add when data has been successfully added.
@app.route('/form', methods=["GET", "POST"])
def main_form():

if request.form:
# print(request.form)
# print(request.form['name'])

# add new record
new_data = Roster(
name=request.form['name'],
age=request.form['age'])
# joined=request.form['joined'])

db.session.add(new_data)
db.session.commit()

flash('New data was successfully added!')
return redirect(url_for('index'))

return render_template("form.html")
Every time we add new data in the form template, we are then redirected back to the home page (index.html). So that’s where we need to put the flash message.
Where you put it is your choice, but for this app, I placed it above the table of data in the home data and below the main navigation
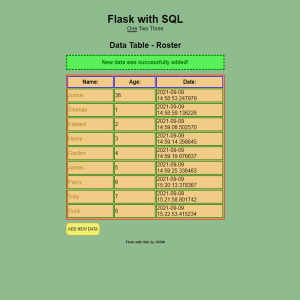
Flash Success Messaging
How does it work?
In the template file, the message as defined in the flash() message inside app.py is passed into a method called get_flashed_messages() which makes an iterable object so it can be looped on. Inside that loop, we can add an HTML element with a class that holds the data by using a working variable in this case, called message. So we have control over what the message will say and where it will go.
<!-- Add flash messaging-->
{% with messages = get_flashed_messages() %}

{% if messages %}
{% for message in messages %}
<p class="success">{{ message }}</p>
{% endfor %}
{% endif %}

{% endwith %}
The with statement makes it possible to create a new inner scope so it doesn’t interfere with other parts of the app. Variables used within the scope of this block are not visible outside of the scope.
Finally, this is the CSS used to get the green bordered effect when the flash message is displayed. And with that, we can use the flash() method in any in the app where a change has been made to the database
.success {
    padding: 10px;
    margin: 10px 0;
    text-align: center;
    background: #5af05a;
    color: green;
    border: dashed green 3px;
}
At the time of writing the final version of this iteration of the app is available at https://jgdm-python-app.herokuapp.com. If you would like to clone it n GitHub you can find the repository at this link.