



Blog: Integrating SQLAlchemy with Flask – #5 (More Posts)
In a new series of blogs related to SQLAlchemy, I’m moving away from the command line environment and moving on to exploring how Python, Flask, and SQLAlchemy can work together to make a website that uses data dynamically.
Recap
When I left it in my last blog, there was an app that had a local development server with 4 interconnected routes that formed a small website. This website contained a form which when submitted, added that data to a SQLite database. We’ve also added the ability to click through to an individual route that displays the data corresponding the primary key field using SQLAlchemy’s queries and Flasks blocks.
You can find the previous editions to this series here.
- https://blog.jonniegrieve.co.uk/blog_posts/integrating-sqlalchemy-with-flask-1/
- https://blog.jonniegrieve.co.uk/blog_posts/integrating-sqlalchemy-with-flask-2/
- https://blog.jonniegrieve.co.uk/blog_posts/integrating-sqlalchemy-with-flask-3/
- https://blog.jonniegrieve.co.uk/blog_posts/integrating-sqlalchemy-with-flask-4/
Now we’re going to add the ability to make edits to the data on the screen and to delete an individual record.
By now you’ve seen there’s a Flask route for everything we’ve been doing. There’s a Flask route for adding new data. There’s a flask route for reading data from the database. We’ve done this for listing all the data and for displaying a single record on its own page. We also need a route for updating data and fixing any errors that might be in the database. Later on in the blog, I’ll show how to delete data from a database.
Updating Records
First I’ve defined the route that will be used to link to the edit form. As you’ll see from the snippet below, it’s similar to the /single/<id> route I built earier. It receives a placeholder parameter in the route URL. The return keyword takes the render_template() as an argument to it as well as the database query so that the template is ready to receive the data when the user clicks onto it.
So, first, the job is to declare the @app.route decorator, define the function with the id parameter, declare a variable that has the query assigned to it, and then render the template on the final line.
@app.route('/edit/<id>')
def edit_data(id):
    roster = Roster.query.get(id)
    return render_template('form-edit.html', roster=roster);
Now, save a new template file using the code from “form.html” template as a base. For this example, the template should be called form-edit.html We’re going to be making edits by reusing the same form and use that to change the values for that particular record.
{% extends "main.html" %}


{% block title_block %} title form {% endblock %}

<h1>Flask with SQL</h1>

{% block nav_block %}
<nav>
<ul>
<li><a href="/" class="selected" >One</a></li>
<li><a href="/two">Two</a></li>
<li><a href="/three">Three</a></li>
</ul>
</nav>
{% endblock %}

{% block main_block %}

<h2>Edit details for {{roster.name}} (ID: {{ roster.id }})</h2>

<form action="{{ url_for('form_edit', id=roster.id) }}" method="POST">

<div class="form-container">

<label for ="name">Name: </label>

<input type="text" name="name" title="Form name" id="Form_name"
aria-label="Form name" class="form_field" placeholder="placeholder name"
alt="form_name" value="{{ roster.name }}"/>

</div>

<div class="form-container">

<label for="age">Age: </label>
<input id="age" name="age" title="Form age" type="text" id="form_age"
arial-label="Form age" class="form_field" placeholder="placeholder age"
alt="form_age" value="{{ roster.age }}" />

</div>

<div id="form-buttons">

<button type="reset">Cancel</button>
<button type="submit">Submit</button>

</div>

</form>

{% endblock %}
Okay, that’s a lot of code in one snippet. So I’ll go over the main points of difference below.
Firstly inside the level 2 heading element, <h2>, I’ve included a {{}} block that references the schema’s ID column and the name column of the Roster database so the user knows which record they’re updating when they find it.
<h2>Edit details for {{roster.name}} (ID: {{ roster.id }})</h2>Next, the input elements now have default values added to them which is existing values of both the name and the age as it exists currently in the database. This is a UX feature to make it easier for the user to make their changes.
<input type="text" name="name" title="Form name" id="Form_name"
aria-label="Form name" class="form_field" placeholder="placeholder name"
alt="form_name"  value="{{ roster.name }}"/>
In the form action, pass in a reference to the form edit function as defined in the main app.py as well as the roster variable so that the ID is passed to the form.
<form action="{{ url_for('form_edit', id=roster.id) }}" method="POST">Finally, in the “single.html” template, add a new button that links to the form edit page with the edit form we just made. It should go below the other main content but before the final @endblock. Ignore the delete link for now.
<div class="edit-delete-block">
<a href="{{ url_for('form_edit', id=roster.id)}}"
class="btn_edit">Edit</a>
<a href="#" class="btn_delete">Delete</a>
</div>
Now it’s time to set up the form so it is editable and the edits that you make persist in the database. Right now all that is happening is that the readable values display in the form. The way to do this is a similar job to the route creating new data. Only this time it’s making changes to existing instances rather than adding new ones. We’re using request.form from the request module again.
app.route('/edit/<id>', methods=['GET', 'POST'])

def edit_data(id):
    roster = Roster.query.get(id)
    if request.form:
        roster.name = request.form['name']
        roster.age = request.form['age']
        db.session.commit()
        return redirect(url_for('index'))
return render_template('edit_info_page.html', roster=roster)
So we’re now saying that if the edit form button has been clicked, process the data using request.form by capturing each individual column that the user enters manually. In this case, there are just 2 records to capture. Once that’s done we use db.session.commit() to make sure the changes are recognised at SQLAlchemy’s end. After that, we redirect to another page. Again, you’d want to include some sort of Flash messaging into your app to inform the user that changes were successfully made, which is an important UX improvement you’d want to make to your app.
Deleting an Entry from the database.
Finally, we can turn to the last database operation, which is DELETE, and add functionality to delete single entries.
In my experience of interacting with the database using CRUD operations, this has always been the simplest job to do.
As always, we will need a URL for deleting the route and a function for the new route defined in app.py.
First, you’ll have noticed I created another link designed for post deletions. Let’s update that first, so it’s ready to delete the record when clicked.
<a href="{{ url_for('delete_route', pet.id) }}"And then let’s add the required route in the app.py file. It will get the required single record in the usual way. It will do this in a python variable and will pass it to SQLAlchemy via the delete() method, before it then commits the change.
@app.route('/delete/<id>')
def delete_record(id):
    roster = Roster.query.get(id)
    db.session.delete(roster)
    db.session.commit()
return redirect(url_for('index'))
All being well this will now let users delete the assigned record from the database, including its assigned primary key.
What effect does this have on the remaining primary keys?
As an experiment, I decided to look at the effect on each record on how the remaining primary keys are assigned. I started out with 6 records at this point, I deleted 2 records via the app including the first one to see what primary key values I’d end up with.
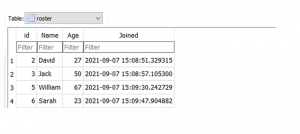
When records are deleted, their primary key values are maintained and not re-ordered. Once they’re gone that’s it. So the first record maintains its original primary key value of 2 and the primary key value 4 is missing from the record.
That covers it for the 4 main CRUD operations. I’ll end this series with the final part of looking at 404 routes and a few more UI tricks that make this albeit rudimentary little app, a little more user-friendly.