



Blog: R6D86: #100DaysOfCode (More Posts)
I’m finally ready to release the 5th iteration of the Photo Viewer App I’ve been trying to build for weeks now. Right now it lives here at https://projects.jonniegrieve.co.uk/photo_viewer/v5/index.html but it will eventually rest at https://projects.jonniegrieve.co.uk/photo_viewer/ as its final URL. It’s taken a lot of work and searching and googling to here. There’s still a lot of work I want to do around this theme, but this it.
Here’s how it works.
https://www.w3schools.com/howto/howto_js_slideshow.asp
In this tutorial, I started to find ways I could leverage the code to fit the design I wanted to have. The designer in me will always want to tinker and make the visual look better but as you can see from the first link in this blog I have achieved everything I set out to do functionally.
I wanted a simple application that would display image data that corresponds to the image being displayed. Now, a software developer might have looked for a way to leverage it from the data stored in the file itself but I got mine from the Windows File Explorer GUI and added it to a JSON file. And the purpose of the JSON is to let people quickly see the photography information behind the images they are seeing. Things like the Shutter speed, the ISO etc.
I wanted a solution that would update numbers shown on screen (i.e. the number of photos in the app) automatically, according to how many records were in the JSON data. So if there were 11 JSON Objects you would see the number 11 in the browser, known as the length of the data.
I wanted a solution with simple left and right pagination buttons so users could quickly move between images and see the text data at a glance.
And here’s how I finally got there.
I started with the JavaScript and CSS lifted from w3Schools. And notwithstanding that these scripts and CSS required elements of specific classes and ID’s I wrote the markup around it so I could make a slightly different design.
I then wrote the code iteratively. I wrote the markup for displaying individual images, and then limiting the entries to 10 photos, wrote them 1 by one to test that the prev/next image buttons were doing what was expected. And they were.
But I knew that this was going to be a nightmare to work with going forward so I wasn’t going to leave it like that.
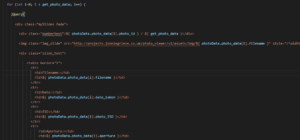
So today, I added a script file and upgraded to the latest version of jQuery. Using the combination of getJSON() and jQuery methods, I transferred one instance of the HTML markup and put that inside a loop that ran for however many JSON objects exists. At the moment that length is 11. This means 11 images are displayed but only 1 at any one time, thanks to the scripts provided by w3Schools.
I wrote the markup including function calls to currentSlide() for each selection dot. For each slide that I intend to use I will need to include a call to this function with its corresponding number.

There was only one real problem with all of this.
Given that I was storing the slider markup in JavaScript and appending this to an element, usually one would then leave the static markup blank so it could be seamlessly replaced. But doing that caused errors in the code that prevented me from using the slider. It also means there were some problems with imagine syncing. That is to say that if I clicked the 2nd “dot” in the slider it would show up as 1/10 indicating the first slide in the slider.. which practically is not quite right even if it’s technically correct.
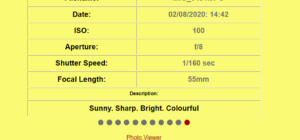
To get around this I added a kind of “placeholder” image to the “first” dot which solves the issue of the syncing problem and means there’s also a static image that takes up the same available space as the dynamic data which means it a more seamless experience.
Finally, I’ve added a sub-menu to the header which will allow for the addition of 2 separate lists…. one for landscape images and the other for portraits… which again will remove any jarring transitions from portrait to landscape images and vice versa in future versions of the App.
There’s more work to come on this and I’ll continue to make visual changes as I have the time but I’m delighted that the app is now functionally ready to go and to be able to use it for what I intended to make it for in the first place. 🙂