



Blog: Make a website with AI (More Posts)
Is it possible to create a website purely using AI such as ChatGPT? On the face of it, the answer to that question is yes. It’s amazing what can be generated with the simplest of prompts.
But like any brief, it’s about more than saying “build a website”; it’s more about what do you want to achieve? What kind of website do you want? What do you want it to do?
Let me try a couple of approaches to this.
Typing in “build a website” as a prompt just returned several paragraphs of general tips on how to go about starting building a website rather than returning code. So I added a few general parameters with the following prompt
build a website with javascript, html and some simple CSSThis returned code for an example site with just a few block-level elements and an HTML button; the idea being that a string of text is displayed as the content of a paragraph on the click of one button.
<!-- HTML - header would go here -->
<main>
    <div class="content">
        <p>Hello, this is a simple webpage built with HTML, CSS, and JavaScript.</p>
        <button id="clickMeButton">Click Me!</button>
        <p id="displayText"></p>
    </div>
</main>
<!-- footer would go here -->
/* JavaScript File */
// Get the button and the display text element
const clickMeButton = document.getElementById('clickMeButton');
const displayText = document.getElementById('displayText');
// Add a click event listener to the button
clickMeButton.addEventListener('click', () => {
displayText.textContent = 'You clicked the button!';
});/* CSS */
main {
padding: 20px;
}
.content {
max-width: 600px;
margin: 0 auto;
}
/* More Styling */Armed with a brief, AI can help you generate a lot of more useful code. For my next scenario, I try putting everything I require in one prompt.
prompt: "Start me off with a website with 3 pages. One page should connect with an api that loads kitten pictures using JavaScript"I anticipate this will list for me 3 pages, return the javascript file in say an app.js file, and some boilerplate CSS.
“Sure”, says ChatGPT, “I can help you get started with a simple website consisting of three pages”.
Curiously enough it actually returned code for only 2 html pages, an index page for the homepage and kitten.html for the API connection page.
The main body of the HTML is as follows, semantically structured one header, one main, and one footer element on each page with all the unique content going in the main element.
<body>
    <header>
        <h1>Welcome to the Kitten Website!</h1>
        <nav>
        </nav>
    </header>

    <main></main>

    <footer></footer>

</body>
Description: Simple Kitten API website created using AI
First, the code is set to run once the content is fully loaded in the DOM.
document.addEventListener("DOMContentLoaded", function () {
2 constant variables are defined below; one for the API key and the other for the endpoint that the fetch request should go to.
// Replace 'YOUR_API_KEY' with your actual API key (if required by the API)
const apiKey = "YOUR_API_KEY";
const apiUrl = `https://api.thecatapi.com/v1/images/search?limit=5&api_key=${apiKey}`;
Finally, the code for making the request to the fetch API is provided. Here’s the general syntax of the code you would use to make a request to an API.
fetch(apiUrl) .then(response => response.json()) .then(data => {

fetch(apiUrl)

    .then( response => response.json() )
    .then( data => { . . . } )
    .catch(error => {} )
And as well as the HTML and JavaScript it also returns the CSS code for us. We can go deeper into that, but you can customise that to design the pages to your own needs. What it all does gives us a start to build upon. It’s a few pages with simple navigation. It demonstrates how to connect to an API and that’s the scenario GPT has returned for me. And while the prompt does give us some CSS to start off with the real fun to be had is how we can leverage what it has provided to introduce some UX features.
Improving the code
For example, it would be really good if we could change the fetch to provide a loading message to the screen while the images are being fetched.
I can add a message to the HTML of course
<p>Loading Kittens...</p>But that’s no good to us because it won’t disappear after the images are fetched. I would have hoped that the fetch would replace the HTML with the list of images as you sometimes see. So here are a couple of things I added to the initial project to make things more user friendly.
Loading images on document load – fetch request
Back at the ChatGPT prompt, the generative algorithm is capable of remembering previous inputs and returning rewrites to previous code. For example
prompt: send a message to browser and remove when kittens have been fetched from the api“To send a message to the browser and remove it,” says ChatG (it saw past my poorly worded request), “when the kittens have been fetched from the API, we can add a temporary message element to the page, and then remove it once the API call is successful.”
It gives us 2 functions called the showMessage() and removeMessage() that perform those functions for us
// show message
function showMessage(message) {
    const messageElement = document.createElement("p");
    messageElement.textContent = message;
    kittenGallery.appendChild(messageElement);
    return messageElement;
}

// Function to remove the temporary message from the page
function removeMessage(element) {
    if (element && element.parentNode) {
    element.parentNode.removeChild(element);
    }
}
It does this: the showMessage() function takes an argument called message, and in that function creates a new paragraph element and that element is added to the DOM. The text content of that paragraph element is passed the string as an argument. All this occurs as changes in real-time to the document tree.
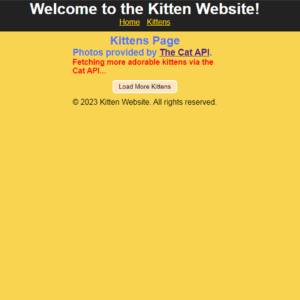
<p class="loading_message">Fetching more adorable kittens by the Cat API</p>I added a class to it programmatically which allows me a more unique way to select it with CSS.
messageElement.className = "loading_message";So, with CSS I added center alignment and red colour to the text to make the temporary message stand out.
#kitten-gallery {

    #loading_message {

        color: red;
        font-weight: bold;
        text-align: center;

    }

}
I added to the function call a variable where you can add any string you like.
// Show loading message while fetching kittens
const loadingMessage = showMessage("Fetching adorable kittens...");
As I’ve said above, the message above is not part of the DOM when the document initially loads. It has to be loaded dynamically and also removed in real-time. It is not part of the HTML document. Appending the child is the way to ensure that we get the message placed where we want it.
//e.g. show message
function showMessage(message) {

    const messageElement = document.createElement("p");
    . . .
    kittenGallery.appendChild(img);
}
The functions written below are there to make sure that the message is written and removed from the screen before the images are fetched from the API.
// Function to show a temporary message on the page
function showMessage(message) {

}

// Function to remove the temporary message from the page
function removeMessage(element) {
}
const apiKey = "YOUR_API_KEY"; // Replace 'YOUR_API_KEY' with your actual API key
const apiUrl = `https://api.thecatapi.com/v1/images/search?limit=5&api_key=${apiKey}`; //
Customise the message loaded to the screen by passing the string argument to the loadMessage function.
// Show loading message while fetching kittene
const loadingMessage = showMessage("Fetching adorable kittens...");
fresh set of images
At the moment all we get from the API is a random set of 5 images on document load.
What we want next is a clickable button to load a new set
prompt: Next, add a button so we can load a fresh set of kitten imagesThis is more of a major change so let’s break down the steps a little further.
- We will need to add a button element to the existing HTML
- Load an initial set of kitten images on document load.
- Assigns individual page loads to an integer variable.
- And with each load, the page number value is updated.
function fetchKittens() {
   // Show loading message while fetching kittens
   const loadingMessage = showMessage("Fetching more adorable kittens via the Cat API...");
   const apiUrl = `https://api.thecatapi.com/v1/images/search?limit=5&api_key=${apiKey}`;

   fetch()
       .then()
       .then()
       .catch()
}

fetchKitten();
We have the contents of the fetchKitten and the function call to it. That’s how we keen the initial fetch request on document load. Assigns an integer to a page number variable.
let pageNumber = 1;And each time the button is clicked, the page number value is updated.
// Load more kittens when the button is clicked
loadKittensBtn.addEventListener("click", function () {

    pageNumber++;
});
To load more kittens each the button is slicked, first get the button usinf the DOM selector.
const loadKittensBtn = document.getElementById("load-kittens-btn");And assign that button to a click event inside which includes the fetchKittens() function call, which will fetch new images every time the event is triggered.
// Load more kittens when the button is clicked
loadKittensBtn.addEventListener("click", function () {

    pageNumber++;
    fetchKittens();
});
Placement of button in the DOM
When I added the button, it easily got lost below each new batch of photos that were being fetched. This caused unnecessary scrolling. below the existing photos. so you never have too far to scroll before the next set of images.
<!-- <p>Loading Kittens</p> -->
<article></article>

<div id="kitten-gallery">

</div>
<button id="load-kittens-btn">Load More Kittens</button>

The complete code is below.
document.addEventListener("DOMContentLoaded", function () {
    const kittenGallery = document.getElementById("kitten-gallery");
    const loadKittensBtn = document.getElementById("load-kittens-btn");

    // Function to show a temporary message on the page
    function showMessage(message) {
        const messageElement = document.createElement("p");
        messageElement.textContent = message;
        kittenGallery.appendChild(messageElement);
        return messageElement;
    }

    // Function to remove the temporary message from the page
    function removeMessage(element) {
        if (element && element.parentNode) {
            element.parentNode.removeChild(element);
        }
    }

    const apiKey = "YOUR_API_KEY"; // Replace 'YOUR_API_KEY' with your actual API key
    let pageNumber = 1;

    function fetchKittens() {
        const apiUrl = `https://api.thecatapi.com/v1/images/search?limit=5&page=${pageNumber}&api_key=${apiKey}`;
        const loadingMessage = showMessage("Fetching adorable kittens...");

        fetch(apiUrl)
            .then(response => response.json())
            .then(data => {
                removeMessage(loadingMessage);

                if (data.length === 0) {
                    // No more kittens found, disable the button
                    loadKittensBtn.disabled = true;
                    showMessage("No more kittens found.");
                } else {
                    data.forEach(kitten => {
                       const img = document.createElement("img");
                       img.src = kitten.url;
                        kittenGallery.appendChild(img);
                });
               }
            })
            .catch(error => {
                removeMessage(loadingMessage);
                console.error("Error fetching kitten pictures:", error);
            });
    }

    // Initial load of kittens
    fetchKittens();

    // Load more kittens when the button is clicked
    loadKittensBtn.addEventListener("click", function () {
        pageNumber++;
        fetchKittens();
    });
});