



Blog: Starting a new design my blog (More Posts)
After a couple of years, and having recently revamped my website, I have decided to have another stab at working on designing for my main blog.
One of the reasons why I wanted to do this is to take some time to look at how code snippet plugins work with it as I do write a lot of these in my blogs. As it is right now I’m always having to modify the code snippets I use because the code extends beyond the containing element rather than breaking into new lines. I want to put that right.
Starting with a plain design first will allow me to look into what I need to do, to achieve that make sure I can build widgets, custom post types, and plugins in place before replacing the plain design with the final one.
Goals for starting the project
- Export the Database from blog.jonniegrieve.co.uk and import it into a fresh WordPress installation.
- Start with a plain design to get testing core WordPress features and planned plugins with my code
- Enqueue Styling
- A newer fresher redesign for my blog based on the WordPress template files I create
- Align with the WordPress hierarchy
Firstly, I’ll show my working out. Here’s my initial plan
Files required
  + index.php
  + functions.php
  + style.css
  + screenshot.png
  + sass.scss (optional)
  + script.js
  + favicon.png (optional)
Included here are the required files needed for a WordPress theme. Without the index.php functions and style.css and screenshot files, there is no working theme. I’ve also listed the sass.scss and script.js files and favicon and made a plan to enqueue those as a minimum.
Custom Templates
    + privacy.php
    + 404.php
    + home.php
    + single.php
    + {post_type}-single.php
    + page.php
    + search.php
    + category.php
    + date.php
    + article.php
    + archive.php
    + category.php
    + author.php
    + attachment.php
    + tag.php
I’ve listed these files based on what is already in place on my current blog. This list covers the high-level range of templates possible as defined in the WordPress Template Hierarchy, I will add other custom templates on top of these, as the project develops.
With the required files in place and confident as I am I have the tools I need to go forward, it’s time to start coding.
<?php echo "index.php"; ?>

<!-- Page Title -->
<title>Blog Title</title>
    </head>
        <body>
            <main>
                <h1>Title</h1>
            </main>
        </body>
When I’m making a new WordPress theme I like to start with a simple file and gradually build up the project with the template files I need. This one starts with a simple <main> containing element with a child <h1> inside of it.
The next step is to identify which parts of the code to move into header and footer templates. Here I can add everything up to the opening main element to the header template along with the wp_head(); method. This method is what allows WordPress to output the scripts and styles enqueued in functions.php, so they don’t have to be included in the markup.
<?php echo "header.php"; ?>

<!DOCTYPE html>
<html lang="en">
<head>

  <!-- Styles and assets <snipped out> -->
  <!-- Canonical link -->
  <link rel="canonical" href="">
  <!-- Page Title -->
  <title>Blog Title</title>

</head>

<body>
   <main>
   <?php wp_head(); ?>
In a similar way everything from the closing </main> tag from below goes into footer.php.
<?php echo "footer.php"; ?>

<?php wp_footer(); ?>
            </main>
        </body>
We use the wp_footer();function, primarily to display the admin bar so we can develop individual pages and manage user accounts and customise aspects of the WordPress core ;
In app.js, I’ve simply written a console.log, as a check to make sure the script file is correctly loading.s
/* app.js */
console.log("scripts/app.js - created 25-01-2023 12:50");
I’ve created 2 sass partials in a directory called Sass which contains basic styles including a background colour for the body element and the WordPress theme comment.
/* style.scss */
@import "_assets/sass/head";
@import "_assets/sass/main";
Using the Sass Watch command, I generated the style.css stylesheet in the root directory, that the requires.
/* Your code... */sass --watch style.scss:style.cssWe’ve set everything up to enqueue the required web assets to the theme. We now need to go into functions.php and write the code that does this. This needs the ‘wp_enqueue_scripts‘ action hook and 2 WordPress methods.
- wp_enqueue_style( ”, ”);
- wp_enqueue_scripts(”, ”);
<?php

  //  echo "functions.php";

  // Add and Enqueue Theme Assets
  function add_theme_assets() {
    // register styles
    wp_enqueue_style( 'style', get_stylesheet_uri() . '/style.css');

    // register scripts
    wp_enqueue_script( 'app', get_template_directory_uri() . '/_assets/scripts/app.js' );

    add_action( 'wp_enqueue_scripts', 'add_theme_assets' );
?>
The last thing we need to do is import the header and footer templates in index.php.
/* require the header and footer */

<?php require "inc/header.php"; ?>
<h1>Title</h1>
<?php require "inc/footer.php"; ?>
All being well, what you’ll end up with is
- A console.log message in the ChromeDevTools that proves the script is working
- A changed background colour for the site homepage (index.php template)
- And the WordPress admin menu showing up at the top of the browser.
Let’s start putting the site together with the “plain” design
Some images you’ll use on any WordPress website will naturally be stored as part of your WordPress theme. Others you’ll add to the media library and be saved in the WordPress database as an upload.
If you want to point to an image you’ve stored in your theme directory, the method to use is get_template_directory_uri().
<!-- Favicon -->
<link rel="icon" href="<?php echo get_template_directory_uri(); ?>
/favicon.png" type="image/png">
Given that most favicons go in the root directory of a website, this should be all you need. Now that I can see the favicon icon in the browser, I know I can use this function to get theme assets in my theme directory
Building some more markup
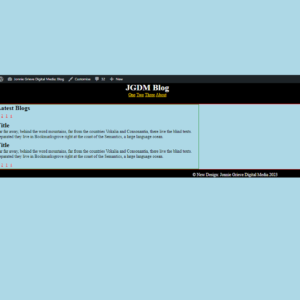
What I wanted to have initially was a space for initial blog entries and another for widgets and other blog features. The way I decided to approach this was to have 2 columns of content in this plain design. The larger portion will contain blog entries and the smaller sized column is for widget areas and other content.
I went ahead and expanded header.php to now include a blog title and main navigation in a semantic header element.
<header>

    <h1>JGDM Blog</h1>
    <nav class="navigation">
      <li><a href="#">One</a></li>
      <li><a href="#">Two</a></li>
      <li><a href="#">Three</a></li>
      <li><a href="#">About</a></li>
    </nav>
</header>
Similarly I gave the footer template its own footer element.
<?php echo "footer.php"; ?>
<?php wp_footer(); ?>
    </main>
    <footer>
        <p>© New Design: Jonnie Grieve Digital Media 2023</p>
    </footer>
</body>
Inside the main element, I decided to put in a new section element where I’d put inside it the 2 columns of content. The primary class and the secondary class determine what kind should content should go in them. CSS and SASS styling with allow them to go side by side on the screen.
<?php echo "index.php"; ?>
<section>
  <article class="primary"> . . . </article>
  <article class="secondary"> . . . </article>
</section>
In the article element with the class of primary, I have 2 little navigation elements that are designed to be pagination links for the blog entries. And each blog entry goes on top of the other, in a containing element with the class of .entry.
<h2>Latest Blogs</h2>
  <nav class="pagination">
    <a href="#">1</a> |
    <a href="#">2</a> |
    <a href="#">3</a> |
    <a href="#">4</a>
  </nav>

  <div class = "entry">
    <h2>Title</h2>
    <p>Far far away, behind  .... snip ...</p>
  </div>
For the other article element with the class of secondary, I began with a series of <aside> elements, the purpose of each one for a single widget area. What this will allow me to do is to have a standard containing elements for each widget area and then be able to examine the selectors available to use when the time comes to add them.
<!-- widgets etc-->
<h2>Title</h2>
<aside>
    <h3>Widget 1</h3>
    <p>Far far away, behind the word mountains,
       far from the countries Vokalia and
       Consonantia, there live the blind texts.
       Separated they live in Bookmarksgrove
       right at the coast of the Semantics,
       a large language ocean.</p>

</aside>
<aside>
    <h3>Widget 2</h3>
    <p>The Big Oxmox advised her not to do so, because
       there were thousands of bad Commas, wild
       Question Marks and devious Semikoli,
       but the Little Blind Text didn’t listen.</p>
</aside>
</article>
Conclusions
I’lll leave it there for this first part. This blog has, by way of example, walked you through the very basics of setting up a WordPress theme.
- We have the required theme files planned out and in place.
- We have used the WordPress methods that tell the browser where to load web assets and to load the WordPress admin menu
- We have a functions.php file that includes the basic code for enqueuing one CSS file and one main JavaScript file
- We have started working on the initial markup and CSS for this first design,
The next part of this series will smarten the site up with fonts and styling discuss the CSS stack so far, start getting information together with the loop…. and work with widgets and other settings.